Friday, February 25, 2011

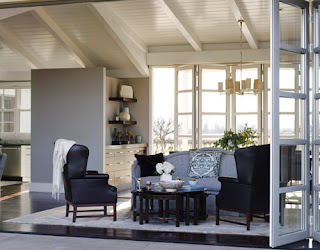
If I were YBC's Studio I would contain:

Soft but bold elements of color...


soft accents of nature ...

Unique storage ideas.... crafty and creative

Loads and loads of windows..

Chandeliers and crown molding....

Birds and trees of all shapes and sizes..

 Magical Images that whisk you away...

color and energy.. vibrancy...

 
floor to ceiling windows and classic styles of furniture with modern updates...

 Windows and Space .. hard wood floors and such...

did We say windows floor to ceiling

Bold prints.... and flowers...


Gilded Mirrors....

 Fireplace.. in our dreams.. hahaha...

High backed chairs and tall ceilings....

Dramatic Drapes....


Loads of storage and oh would we die for that table!


And maybe a bit of all of this.....


A little blend of all of this and were in business! 

Whimsically 
-YBC

Thursday, February 24, 2011

Share the Love Get "DEEP FRIED" TOMORROW!!


Dear Friends and Followers, 
We are so excited to Introduce and Support our Favorite Band 


 "DEEP FRIED 5"


as the Compete in the Music City Mayhem Battle of the Bands
 to win the chance to Play LIVE ON THE GREEN in Downtown Nashville TN this summer. We are soo excited, we urge you to pop onto the page and take a listen yourself!! You will not be disappointed! their Soulful Blends and Funky Sounds keep us asking for more ... and while your there VOTE for Deep Fried 5! 
Voting Begins 
Friday (tomorrow) at 10am and ends at Midnight
DON'T MISS IT!! Click, Support and help us cheer on our friends as they Battle for Live on the Green!!!


Everyone Vote for our Friends The Deep Fried Five in The Music City Mayhem Battle of the Bands! You must go vote at Lightning 100 from 10 am to midnight TOMORROW!!!! Come Support them on their way to "Live on the Green"!!


Vote Here


Magical Beaded Chandelier:

This is a great project that we found but admittedly we didn't have time to try yet so we decided to pass this wonderful idea onto you!


Gather your materials: LOTS of beaded necklaces, cut into long strands (the Mardi Gras kind)
                                       Metal hanging garden basket
                                       A spool of thin-gauge wire
                                       Wire cutters
                                       Wire clothes hanger
                                       Pendant light kit (cord & socket)
                                       Metal chain to hang the fixture
                                       Light fixture mounting bracket, bolt & loop
                                       Light fixture ceiling cap
                                     
Start with a hanging garden basket.  Go ahead and paint it to blend with your beads (or the finished color of your chandelier if you plan to paint your beads).  I used a ladder to suspend the chandelier while I worked on it. 

Top it off.  Because I wanted to wire this fixture, the metal hook on the basket wasn't going to cut it.  I needed to be able to add a pedant light cord and a chain somehow.  I ended up wiring a light fixture ceiling bracket to a ring made from a bent clothes hanger.  The loop on top screws onto a hollow bolt that screws into the bracket, which later allowed me to attach a chain. 

Add a little structure.  I wired on a ring (again, made from a bent hanger) about half way between the top of the chandelier and the lower ring for a little more shape.  This allowed the beaded strands to swag a little without the metal chains showing. 

Start beading!  After figuring out that my beaded strands were just a tad longer than I needed to go from the top to the bottom of the fixture with a little swag in the middle, I started attaching them around the top ring by looping wire around the top bead of each strand and the metal ring.

My chandelier looked a little crooked at this point, but straightened up once we attached the chain and hung it. 
Aaaaand bead some more.  This is definitely the most time-consuming part.  Just make sure that you have good coverage all the way around.  I attached all my strands at the top first, then at the middle (the top part of the basket -- so they would swag a little), then at the bottom.  In the photo above I had attached the beads at the top and middle and was trying to make sure there weren't any bare spots before attaching them at the bottom.   

Trim away the excess.  If your strands are a little longer than you need, just cut off the extra after attaching at the bottom of the fixture. 

Add a chain and ceiling cap.  

Paint it up.  Give the whole thing a coat or two of paint if you want.  I decided to do this because I found that it made the wires and chains blend in better with the beads

Hang it.


Admire.  

Good Luck DIY'ers!!

Thursday, February 17, 2011

Newspaper: From Drab to Fab

You want to take your newspaper from drab to fab?? WE DO!   This is a Great DIY to try that super cheep and easy.. and oh what and effect!


Simply roll your newspaper into small tubes and glue onto a foam wreath.. starting from the outside and working your way in until.. well its full!


Once you've filled the wreath all that you can.. fluff and you are ready to go!


 Then Hang admire and enjoy the compliments!

Enjoy and Good Luck
-YBC


DIY : Organize

Here are just a few Ideas for Organizing we've come across that we love and want to share with you!

These metal tins are a great way to organize in your kitchen or office if .. like me, your short on storage and counter space.. using this as an inspiration, you can recycle old tin cans, or get the new ones at your local craft store.. they should carry tin boxes and cans ...  then instead of mounting them to the attached bar, you can drill them directly into studs  or mounted wooden backboards...

This is one of my favorite ideas yet .. all you need to do to create this is place nails at equal intervals down the side of an old picture frame, then just string clear wire from each side and you've got an amazing earring organizer...

This is a great way to add color and charm with this unique key holder,  and bonus.. you may never loose your keys again...

This is a great idea for all those crafters and sewers! Separating everything with little boxes.. Ideal... I love when everything has a place!!

This is just a fun DIY that I love. Magnetic picture frames are a great way to add character to a space and don't forget they double wonderfully as note pads.. using expo markers to leave notes that can be wiped off with very little effort!  Check Previous DIY's for more specific instructions on unique picture frame magnets.

Good Luck and Enjoy
-YBC
Tuesday, February 15, 2011

A Whimsical Fairytale...

 Found these beautiful images that completely Mesmerize us !


A bed in the trees... reminiscent of "A Midsummer Nights Dream"


A place in the trees for you and me...


The Princess and the Pea you shall be 


Its a Magical Fairytale 

What a breathtaking photo .. dreaming of waking up in this bed!

 LOVE LOVE The birds flying out of the dandelion!
 Magical

Picture Perfect Jewelry:

 This is a great DIY project that we found recently! We love love the ease of this project and the stunning outcome it creates..

Its a Picture Frame Jewelry Organizer!

You'll be needing :
A Picture Frame of medium size, ribbion, knobs and specialty hardware, peg board to fit ur frame

First you must make sure that your peg board is cut to fit into your frame ... then you can tie ribbion through the peg holes to create a surface to hang your jewelry on


You can also tie on your unique hardware..


Once you've tied on all the pieces you would like, you can place your peg board in the frame


And Voila! Simple as that! 
You end up with a beautiful decoration piece as well as a funcional organizer!

Good Luck
-YBC