Wednesday, May 25, 2011

Must Have Shoes!! (On a Budget.. Shhh its a secret

$25.30

Sale!! $15.80

$25.70


$20.60
 Oh ya shop and Enjoy!!
Whimsically
YBC

Decor Du Jour: Pom Poms


DIY Pom Poms
hanging-pom-poms_1
Supplies:
fabric of your choice
scissors
hot glue gun
chinese lanterns.
hanging-pom-pom
Step 1: Cut circles out of fabric.
Step 2: Fold the circle in half and put a little hot glue on the center, then fold over to secure.
Step 3: Apply more hot glue to the bottom of the folded circle.
hanging-pom-poms
Step 4: Press the bottom of the folded circle with the hot glue onto the chinese lantern.
Step 5: Repeat these steps until the whole lantern is covered. Once finished, attached some fabric to the metal frame of the lantern to hang.
hanging-pom-pom2

So Beautiful and Precious 
Goodluck and Enjoy

Whimsically
YBC

Rustic Candle Holder:

candles04
One of our belt designers, Cristina, has been busy working on some unique home creations.  She photographed this D.I.Y. to share with us and we can’t wait to try it out– she says it’s so easy! Since Easter is this weekend, wouldn’t this also be a cute approach to a basket?
candles01
Materials:
candle holder with flat sides (any size)
craft adhesive– multi-purpose for wood and glass surfaces
garden pruners
dry tree or shrub branches
candles02
Step 1. Wash the candle holder with dish soap and dry well. Cut the branches down to sticks close to the height of the candle holder, it is best to cut a few at a time.
candles03
Step 2. Dab the glue on a stick making sure to hit the areas that will be flush to the glass. Place on the glass.  You can do a few at a time and then hold until they won’t slide off before you rotate the holder.
candles04
Step 3. Repeat until all of the glass has been covered. As always, if using a candle holder do not leave these unattended! Isn’t the end result just magnificent?

GoodLuck!
Whimsically,
YBC

Matchbook Notes:

matchbook_notes
Our intern, Kara, created this D.I.Y. just in time for Mother’s Day! At first glance you think it’s just a fancy matchbook, but when you look inside, you realize it houses a special, personalized note! Fill the inside pages with little drawings, quotes, or messages. We like the idea of writing out the 10 reasons why Mom is the best on each page. You definitely can’t leave out the sandpaper strip on the back- it’s the best detail!   Of course, these are great to give anyone, or simply as a gift to yourself.  Read on to see the step-by-steps to this project.
materials
Materials :
Scissors
Ruler
Cardstock
Printer or notebook paper
Sandpaper
Rubber Cement
Pencil
Stapler
step-2
Step 1. Measure out and cut cardstock to be approximately 1.5” x 4.25”, cut sandpaper to 1.5” x .25”, and cut notepad paper to 1.25” x 1.75”
Step 2. Fold the cardstock up about 3/8”.
step-3
Step 3. Then fold the cardstock in the center two times like a matchbook.
step-4
Step 4. Insert the notepad paper of your choice, and staple together.
step-5
Step 5. Glue a strip of sandpaper to the back of your matchbook.
step-6Step 6. Decorate the front of your matchbook with printed paper or fabric trim.
Step 7. Draw or write messages on the note paper inside. Whoever receives this matchbook, will be pleasantly surprise!
GoodLuck
Whimsically,
YBC

Handmade Coatrack

 Found this great DIY  that I know everyone will love 
 had to be shared and passed on!!
There’s something so cool about displaying a clothing rack in your space. Of course it’s functional, but it’s also aesthetically pleasing when certain items are hung next to each other.   Over on You Have Broken the Internet, we noticed a great D.I.Y. that teaches you how to make your very own coat rack out of base pipes and wood. When we first laid eyes on it, we instantly thought about the vintage rack we had in our Fall ’10 catalog. This D.I.Y. rack looks like one of those expensive vintage pieces; however, it costs only $71 to make! This one’s worth jotting down on your weekend to-do list.

Please try and Enjoy!!!

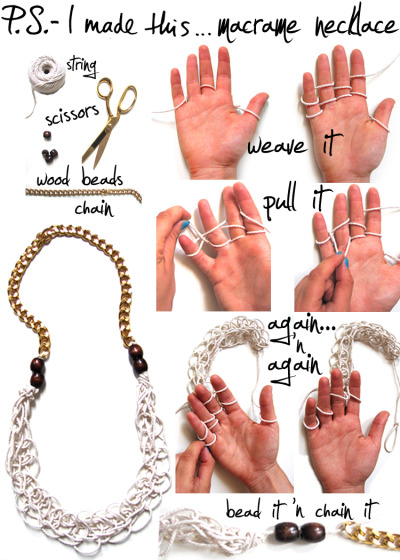
Macramé Necklace

Found this Great DIY and just had to share with you guys!!

I’ve been roped in to a DIY obsession that’s got me all tied up at the moment.  I cannot stop weaving and knotting for the life of me!  Currently, were seeing the macrame and summer crochet trend all over the place.  Don’t think hippie-chic looks and handwoven plant hangers- Macrame and crochet looks are back in a modern and wearable way.  Chanel’s SS10 collection is bursting at the seams with this delicate, light-weight design that’s to die for.  Oscar de la Renta proved this trend is gonna stick around for a bit as we spotted some macrame cameos in his Cruise 2011 show as well.
To create you own version of this macrame-style rope necklace, grab a spool of rope and loop around your thumb.  Weave over and under your fingers, back and forth until you create 2 rows of rope of each finger.  Remove the bottom string over the top on each finger, until you leave just one row left.  Continue to weave over and under, always creating 2 rows of rope and pulling the bottom rope over the top.  After you’ve created your woven design, remove from the fingers, loop the strand through all the finger holes, add beads and chain- and you’re ready to roll!


Check out more great DIY's from P.SIMadeThis.com!!!

Monday, May 23, 2011

Check out some of these Amazing Rings!!

 Check out some of these amazing rings.. Really there is something for everyone!!

$24.00

$28.00

$35.00

$35.00

$35.00

$24.00

$24.00


And there is so much more.. check these amazing rings out at Galibardy.com


Its a Steal for these Heels!!

 I've found some amazing heels for a steal and just had to share them with you!!
$46.70

57681-TAUPE
$24.70

58294-GREEN
$24.70

velvet snake print trim pump
$26.40

57790-NUDE
$24.70

53841-BLACK
$23.50
GoJane.com
Sale $18.60@ UrbanOG.com

44891-OLIVE
$22.00

$22.90
Hope you Love these and Happy Shopping!