Tuesday, November 1, 2011

DIY Your Shoes!!! I Dream of Boots!!

 Here is an awesome tutorial for anyone whose favorite shoes are maybe just not quite right ( like they are flats when you desperately want heels) or are a bit past their prime...

Now first things first remember not everything works out the first time.. these things can take practice so unless you are just super fed up and willing to possibly loose a pair of beloved shoes... proceed with caution... Me however.. I throw caution to the wind and say what the hell!

So What You'll Need:
Fabric Glue
 Fatty Paint Brush
 Old Boots ( crummy falling apart or just want to make a change)
New Boots ( well newer that you dont mind never seeing again) 
Scissors
Scrap Leather ( around 1/2 a yard or so)
*Courage
*Patience
( possibly a sewing Machine or needle and thread)


To Begin:
Take the Boots that are falling apart and cut around the sole as close to the sole edge as possible.
( note: sorry for the horrible images.. I always forget to take the photos as I do the projects but you get the idea)

Next:
 You want to try your original shoes on with the now free upper of the boot laying over it. This way you can get a feel for how  well it will fit on the new shoe's last. After you have done this you will be able to get an idea as to wether or not you will need to sew up the upper at all to fit... for this pair I did take a little bit out of the heel for a more snug fit. but honestly I don't recommend it.. its very easy to get them too tight and u don't want to ruin your shoes at the first step.

 Now the Scary part:
You will have to cut down your nice boots so that you can attach the new boot upper and slide in clean.. you don't want two layers of boot in there or it will be too thick and probably uncomfortable.


A tip from learning as I went: cut the heel down about 1/2''


This allows you to slide your foot in much easier ... without doing this .. they were practically impossible to put on.

 Next:
 You get to do some painting with glue!!
Put both pairs of the shoes on.. top layer first then the cut newer boot underneath... what you'll do is literally paint the entire shoe with fabric glue.. thick layer but not too thick.. it can get a bit messy and if you have suede shoes like I did .. thats no good.. also it wouldn't hurt to keep a wet rag near by just incase you need to use it to wipe yourself or the shoes off.

Then:
After painting the under layer with fabric glue... carefully slide the top layer over it and fit in on smooth. You do this with your foot in the shoe so that it acts as the last and allows you to get a good clean smooth fitting. Try and get the top layer nice and tight and as close to the sole as possible.

After you have fitted the top layer on the new sole, cut a think strip of leather long enough to wrap all the way around the sole of the shoe. Paint it with glue and then carefully line the very bottom of the shoe with the leather strip.. this gives a nice clean finish and also acts as a sealant.


And Voila new boots!!!

Seriously this is a challenge, but its so fun and rewarding its totally worth trying! I am so happy with my results and all in all it was a lot easier then I had anticipated. 
Good Luck and feel free to E-Mail me with any questions

Whimsically,
YBC

Mustaches Mean Halloween!!!!


 We had such a Great time with everyone that came out to the GED Funk and Soul  Halloween Event at the Pond last night!! Hope everyone enjoyed the Mustaches! 

In addition we would love to see your awesome Mustache and Costume shots! Please send us your best Costume or Mustache shots to:
 YellowBrickCloth@gmail.com or post them to our wall on FB
-http://www.facebook.com/profile.php?id=100001890296707 !!

 We'll be posting and sharing them all week... let the fun continue!

Thanks Again for Such a Great Halloween 2011!!

'Whimsically,
YBC

Tuesday, October 4, 2011

We Craft Our Way Through Everything Here:

 Magazine Bows:
 These add a great personal touch to every gift this year! 
And keep an eye out for our home made cards as well!


Mustaches on Sticks:
What a Great way to add a little silly fun to your events..
YBCLifestyles Mustaches on Sticks make even the simplest occasions ones to remember


Keep your eyes open for more Entertainment extras.. 
Cupcake Stands... Cake Stands..  and soo much more!

Tuesday, July 19, 2011

YBC: Recycled is here!!


YBC:Heritage Collection Now Available!!

Golden Dreams Necklace   $35.00

Bone Rod Feather Necklace  $28.00

Beaded Dreams Pendant Necklace $38.00

Bone Ribs Feather Necklace $ 38.00

Dream Catcher Feather Necklace $38.00

Dream Catcher Feather Necklace $38.00

 
Assorted Feather Earrings and Hair Clips from $10.00 to $30.00


Leather Bound Feather Necklace $24.00

Turquoise Feather Necklace $35.00

Red Bound Feather Necklace $24.00

Feather Tears Necklace $35.00

 Recycled Leather Fringe Purse $65/00

Monday, July 18, 2011

Salvaged Drawers into Modular Bookcase!!

Wine Bottles into Vases and Votives:

Ok so heres the deal.. I found this great DIY, but it is def a bit of a difficult one.. and if you are clumsy and accident prone as I am you will definitely want to employ the help of a strong and steady hand ( aka : father, boyfriend or very patient roommate or friend :)haha ) but if your a big wine drinker and love candles and crafts this one could definitely be for you! This is also a great idea for Brides on a Budget!! Centerpieces, gifts ect.. so many uses you cant go wrong.. so grab a glass of wine (or 4) then, roll up your sleeves (preferably after the buzz is worn off mind you) and get to crafting .. 
DIY - How to Turn a Wine Bottle Into a Vase or Votive :  wedding baltimore decor diy reception tutorial Large I
 You'll Need:
* A bottle cutter here .$40 may be a bit steep for you but if you plan on using this for a Wedding craft it will surly pay for its self.
Step one: Clean the bottles and soak them to remove the labels. Some will peel off easily, some will scrape off, but you should NOT use the X-Acto knife. Otherwise, you’ll cut yourself. Goo gone or similar products do the trick.
DIY - How to Turn a Wine Bottle Into a Vase or Votive :  wedding baltimore decor diy reception tutorial Dscf035
Step two: Score the bottles using the bottle cutter. This is a great place to employ those strong steady hands. Remember to maintain pressure on the bottle towards the back end of the bottle cutter. The lines should be even and match up with each other at the end.
DIY - How to Turn a Wine Bottle Into a Vase or Votive :  wedding baltimore decor diy reception tutorial Dscf037
Step three: Get in touch with your inner pyromaniac. Slowly rotate the scored line of the bottle over a candle flame. Maintain inward pressure on the bottle (gently gripping and pushing the neck and the dimple/bottom rim toward the center).  A great system of 2 sloooow rotations over the flame combined with step four.
DIY - How to Turn a Wine Bottle Into a Vase or Votive :  wedding baltimore decor diy reception tutorial Dscf03701 NOTE this is a borrowed DIY this lovely lady is not me :)
Step four: Break out the ice. Take an ice cube and quickly make your way around the scored edge to quickly cool the bottle.
DIY - How to Turn a Wine Bottle Into a Vase or Votive :  wedding baltimore decor diy reception tutorial L100078
Step five: Repeat steps three and four as necessary. Often the bottle will sort of slide off the edges.
Here is the finished product!
DIY - How to Turn a Wine Bottle Into a Vase or Votive :  wedding baltimore decor diy reception tutorial Dscf0370 DSCF0370
This takes a fair amount of patience. DO NOT try to force the bottle. You’ll end up with rough edges, glass shards and a ruined bottle. Bottles range in thickness so some bottles will be easier than others. Seriously, only tackle this project if you are either A) blessed with patience or B) willing to learn patience
I recommend only tackling a case of bottles at a time, because it does get tiring and they add up over time. 

I’m excited, because I don’t think I’ll ever buy a votive holder again. “Found” elements are important to me and I’m glad I could give these bottles a second chance at life!

GoodLuck and Be Careful!

Whimsically,
YBC

DIY:Sugar Cubes

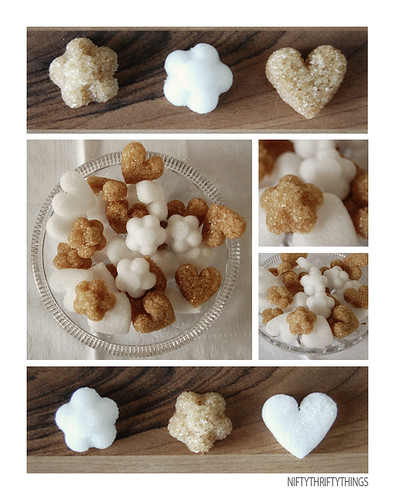
{DIY sugar cubes}


Why not spruce up the way you serve coffee or (iced) tea? 
Last night I played around with sugar a little and made my own sugar cubes. It's really easy to make and so cute to look at! 
You should give it a try!

What you'll need:
  • granulated white and/or brown sugar
  • water
  • bowl
  • teaspoon
  • ice cube tray or candy mold

{DIY sugar cubes}

How to:
  1. Pour about 1/2 cup of sugar into a bowl.
  2. Use a teaspoon to pour small amounts of water on the sugar, little by little, and mix until it is a paste-like consistency. Make sure the sugar doesn't melt during this process. 
  3. Fill the sugar-water-paste into ice cube trays, about half-way full, and press tight into the mold.
  4. Let dry overnight.
  5. Carefully remove the sugar cube from the ice cube tray.
  6. Enjoy!

{DIY sugar cubes}
This is the most precious DIY perfect for Tea Parties or any festive event!!!!

Classic Giftwrap: Beautiful and Tasteful that won't break the bank!!

This gift wrapping idea is ridiculously easy, which is very necessary in my busy life right now!
1. Use pinking sheers to cut 9 strips 1/2-3/4 inches wide:  For length cut 3 at 10 inches, 3 at 9 inches, 2 at 8 inches, and 1 at 6 inches.  (You can use a variety of lengths for different size bows)
 2. Loop each end around and staple the middle.
3. Hot glue largest to smallest alternately to make the bow.  Loop that last one into a round circle and glue in the center.  Buttons look really cute in the center, too.
I used canvas, burlap, and a sheer stiff cotton (a curtain at the thrift store) for fabric.  As long as it has some sturdiness to it to show the fold, it will work.  You can see the difference in stiffness between the canvas and sheer cotton in the picture.  Pinking sheers gives it a really nice finished edge.  Sky is the limit with fabric choices and colors. 

I love grouping them together to show the texture.  Add some yarn and an old-fashioned tag and it completes the ensemble. Using the hot glue makes them easy to peel off the paper, so they are definitely re-usable! 


Good Luck and Enjoy your Wrapping

Whimsically,
YBC

Wednesday, July 13, 2011

Cereal Box to Gift Box! RECYCLE ,RECYCLE, RECYCLE

Gift Box from a Cereal Box

Here is one of the Ultimate Recycling Projects! We all need and use gift boxes but hate to spend that extra cash on such a little part of  the gift ... we'll heres the perfect remedy! Not only does it save you that spare cash, but you lighten your recycling load in the process...

You'll need some very basic tools:
-Hot Glue Gun, and glue of course
- Scissors
and of course a Cereal Box!
Step 1: Cut and Flatten the box
Cut the box down the middle. I like to cut down the side that doesn't have the tab on it.


Step 2: First fold
Fold the box in half.

All of the folds don't have to be exact.
Step 3: Second fold and make some cuts
Fold the bottom half in half.

At the bottom of the box, cut up to this fold on the right and left.

From the top of the box, cut down to the first fold on the right and left.
Step 4 : Third fold
Fold only the middle section of the top half in half.

Step 5: Cut away what you don\
Cut the box so it looks like the picture below. The cuts don't have to be exact.

Step 6: Glue down the front flap
Flip the box over. Use hot glue to secure the front flap down

Step 7: Glue down the sides
Use hot glue to secure the side flaps.

Step 8: Glue the back
Use hot glue to glue the back flaps.

Step 9: Done gluing

Check the piece. The box should look like this when you're done gluing.

Step 10: Fold the lid
Reverse the existing fold to form the lid.


Step 11: Finish the Box
 and Voila your done! .. at this point you can stamp it to add a little personal touch or just wrap it in ribbons and lace and call it a day !

Good Luck!!

Whimsically 
YBC

Tuesday, July 12, 2011

Jute Wrapped Pears

"J" is for Jute

Jute covered pears.


Jute ranks right up there with drop cloths, distressed white paint, burlap and rope - love.

A little knock off of Ballard's giant jute pears.

Twine Pear

image from Ballard

And how about some jute eggs for Easter?


Here's how I made the pears:
(I used the same method for the eggs.)

1. I used newspaper mache pears from Michaels ($1.50 each) but regular plastic pears would do and standard jute string.


2. Start at top, glue near stem and wind jute adding glue every few inches.

Too easy.  So why pay $25 for Ballard's giant pear when you can have a whole vase full for a fraction of the cost?


 Good Luck 

Whimsically YBC